Dynamic Content With Static Site Generator – /linklog using Hugo
Introduction#
Static site generators have gained popularity due to their simplicity, speed, and security benefits. However, one limitation of static sites is the lack of dynamic content. Typically, static sites are built with HTML and some assets, but that’s it. In this post, we will explore the concept of dynamic content in static sites and how to implement it using Hugo, a popular static site generator that I use for my blog.
You have three options to add “dynamic” content to a static site:
- Client-side JavaScript: Fetch data from an API and render it on the client-side.
- Cron job: Rebuild the site periodically to fetch new data.
- Webhooks: Trigger a rebuild when new data is available.
Journey to a Dynamic /linklog Section#
I learned about this topic when I wanted to create a /linklog section on my blog. The idea was to have a dynamic section that would automatically update when I add new links to my collection. I wanted to avoid manual updates and automate as much as possible.
To my surprise, even when I got Hugo to fetch the content from an API, the content became static the moment the site was built. Not what I wanted. I needed a way to keep the content dynamic and up-to-date.
The journey itself was quite hilarious, with many trial and error attempts. But in the end, I managed to create a dynamic /linklog section using Hugo. Let’s dive into the details of how I achieved this.
Implementing Dynamic Content#
Firstly, you need to have a source of dynamic content. In my case, I created an API that fetches links from my read-it-later app and Mastodon. The API returns the links in JSON format, which Hugo can parse and render on the site. If you know a little bit of programming, you should be able to set up a simple API using your favorite language and framework, there are also many services that can help you with that. In my case, it was a simple Ruby Sinatra app serving /links endpoint.
Once you have the API set up, you need to fetch and parse the dynamic content using Hugo’s templating system. Hugo provides a powerful templating language that allows you to manipulate data and generate HTML pages. You can use the getJSON function to fetch data from an API and then loop through the results to render them on the site. There are a few examples in the Hugo documentation that can help you get started.
I created a shortcode in Hugo that fetches the links from the API and displays them. Here is an example of the shortcode:
layouts/shortcodes/links.html
{{ $apiUrl := .Get "url" }}
{{ $links := getJSON $apiUrl }}

{{ $data := $links }}
{{ range $links }}
  <div>
    <a href="{{ .url }}" title="{{ .description }}">{{ .title }}</a>
    {{ range .tags }}
      <code>
        #{{- . -}}
      </code>
    {{ end }}
  </div>
{{ end }}
It fetches links from the URL passed in the shortcode and renders them as a list of links with tags. You can customize the shortcode to suit your needs and style it using CSS.
In order to use the shortcode, you need to add it to your content file. Here is an example of how I added it to my /linklog page:
---
title: My linklog
---

These links are cool!
{{<links url="https://example.com">}}
And that would be it. If you build your site now, you should see the links fetched from the API and rendered on the page. But the site is still static, and you need to rebuild it every time you add new links. Let’s automate that.
Automated Deployment Trigger#
I’m a big fan of automation. I automate many things to save time and reduce errors. The setup I have for my blog is that whenever I push a new commit to the repository, Netlify automatically builds and deploys the site to the server. There is also a build hook that I can manually trigger to rebuild the site.
Since I have the hook available, I decided to use it to trigger a rebuild whenever I add new links to the API. I connected all the pieces using N8N, but Zapier, IFTTT, or any other automation tool should work as well. Here’s a preview of the workflow:
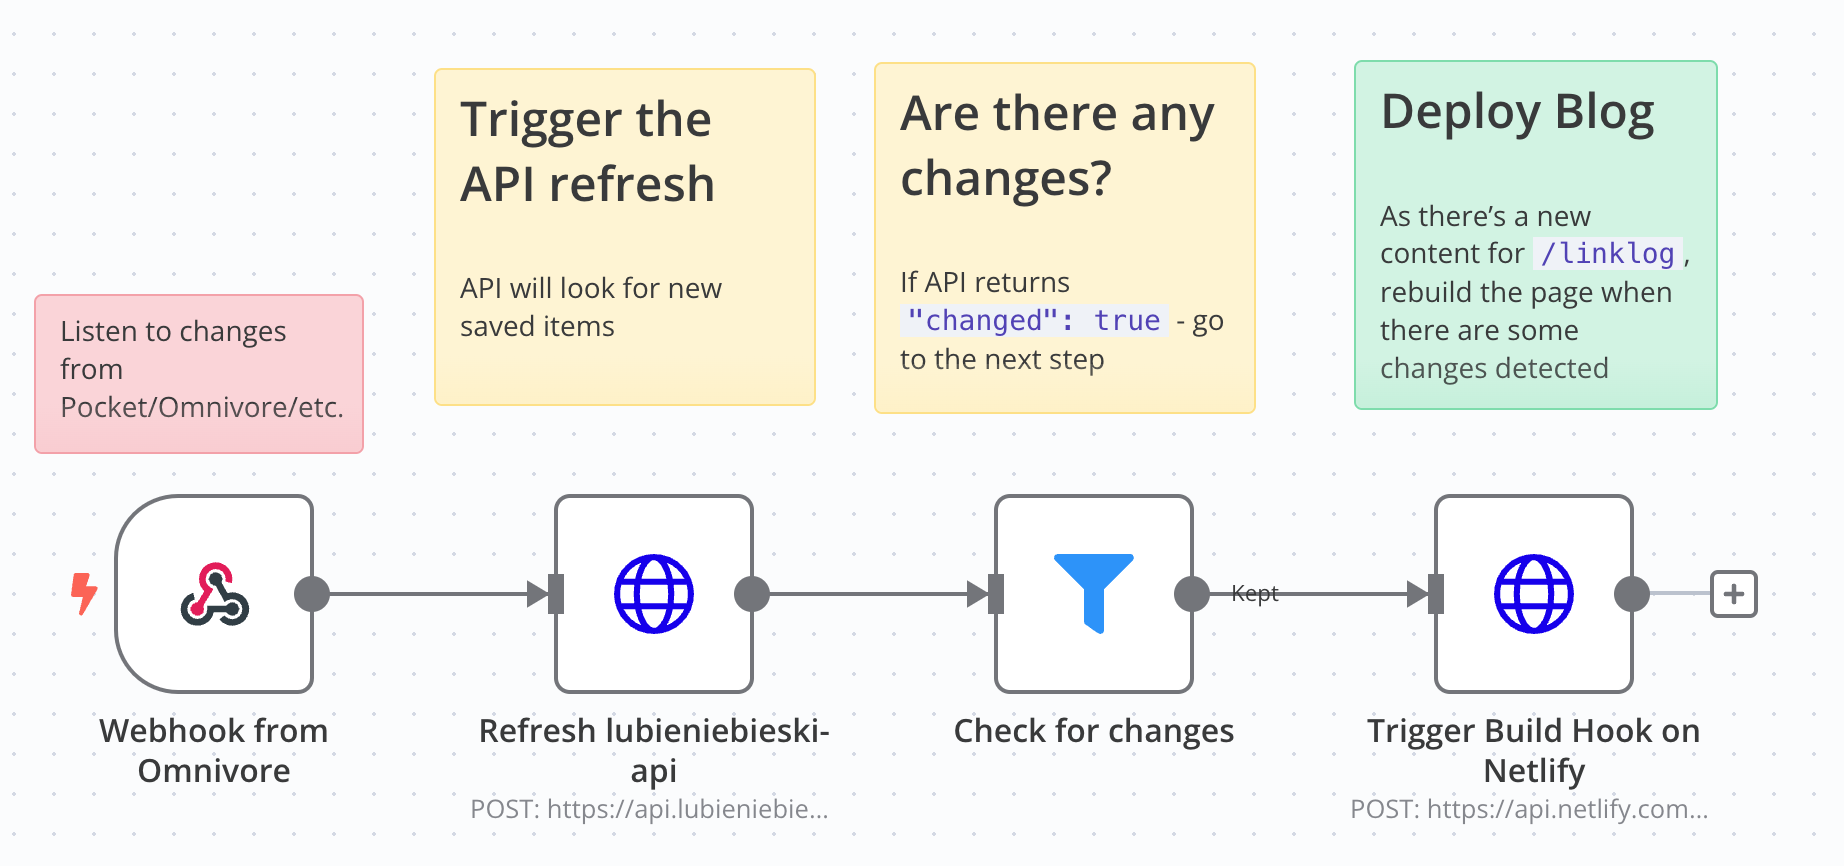
As you can see, whenever I save a link using my read-it-later app, a webhook is triggered. This webhook then triggers the API refresh and the Netlify build hook. The site is rebuilt, and the new links are automatically added to the /linklog section. Automation FTW!
Benefits and Lessons Learned#
With all the pieces in place, I can now focus on curating links and not worry about manually updating the site. The /linklog section is dynamic and up-to-date, providing a better user experience for visitors. The time-saving aspect is also significant since I don’t have to spend time updating the site manually. The truth is, I used to forget to update the site, and as a result, the /linklog section was always outdated. But now, it’s always fresh!
I can also customize the shortcode or create a similar one to use for “monthly summaries” or “weekly notes” sections. The possibilities are there!
I also didn’t publish this post until I figured out the site update automation. Now, I feel more confident about sharing this approach with you because I know it works and is reliable.
The additional API I created can be used for other purposes as well.
It turns out that one’s static site might not be so static after all!
Latest commit: 0d5290c on 2025-12-26 at 22:10. Page history